Introduction
Augmatic GRE Lite generates evolving drum patterns using proven musical algorithms. You can play endless rhythmic variations that naturally balance simplicity and complexity — without tedious manual programming.
Watch Tutorial Video
Main Features
- 3 GENERATIVE CHANNELS — bass drum, snare and hi‑hat.
- TOPOGRAPHIC ENGINE — for morphable, evolving beats — based on the Mutable Instruments Grids Eurorack module.
- EUCLIDEAN ENGINE — for evenly distributed rhythm patterns.
- BLEND CONTROL — to mix Topographic and Euclidean styles.
- LINEAR DRUMMING — no two drum hits occur at the same time.
- VELOCITY BENDER — for a more expressive, dynamic pulse.
- GROOVE TOOLS — swing, humanization, clock division, and timing shift.
Need more power? Get Augmatic GRE:
- 6 DRUM CHANNELS - instead of 3.
- MASTER SLIDERS - global control over groups of per-channel knobs.
- Bigger LINEAR DRUMMING matrix with more controls.
- VELOCITY BENDER for selected channels with shape visualisation.
First Steps
- Download Installer —
.exefor Windows or.pkgfor Mac. - Install — Run the Installer.
- Open your DAW — Ableton Live, Cubase, Bitwig, etc.
- Enter License and Activate — requires internet connection, must be done only once.
- Add Augmatic GRE Lite as a VST3 instrument
- Route MIDI output to a drum instrument on another track
- Press Play — patterns generate and MIDI notes flow to your instrument
If you already understand how Augmatic GRE works and have a specific question, see the Frequently Asked Questions (FAQ).
MIDI Output
Augmatic GRE Lite is a MIDI effect — it generates MIDI notes and makes no sound of its own. You need to route its MIDI Output into a drum instrument (Drum Rack, Battery, FPC, XO, or any sampler / synth that accepts MIDI) which produces the sound.
MIDI Setup Guides for Supported DAWs
MIDI in Standalone App
- Mac, iPad and iPhone - the Standalone App creates a virtual MIDI port named
Augmatic GRE Lite, which any other app can use as an input. You can also play with any hardware MIDI instrument connected via the MIDI interface of your sound card, or a USB cable. - Windows - the virtual port is not available in the Standalone App. Choose a hardware device, or a virtual MIDI cable such as loopMIDI.
Built-in Tutorial
Augmatic GRE Lite includes an interactive tutorial that walks you through the most important features and at the same time, allows you to experiment with controls described in the instructions.
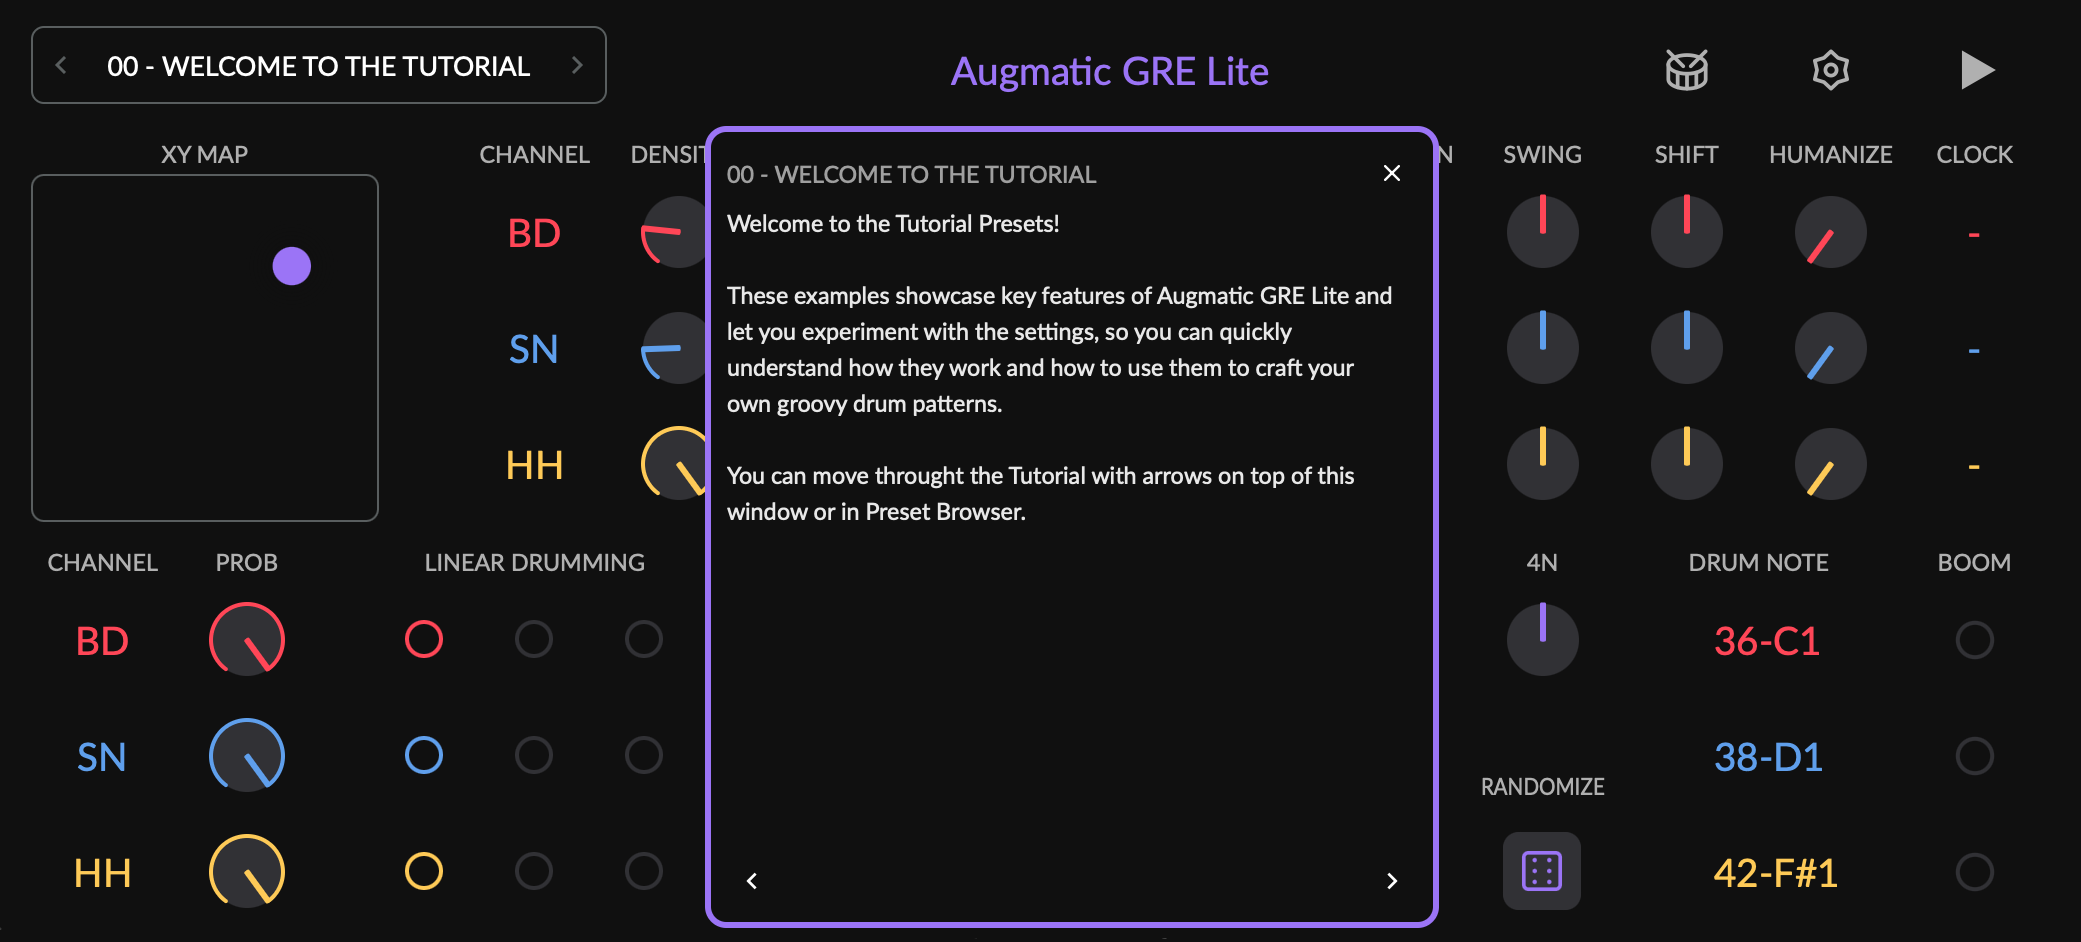
To open the built-in tutorial:
- Click SETTINGS icon → BUILT-IN TUTORIAL.
- Click PRESET MENU → navigate to [Factory] Tutorial Presets folder, load any preset to start from that topic.
The tutorial has < and > chevron buttons at the bottom to step through tutorials in order. You can also use the < and > chevron buttons in the PRESET MENU.
Interface Overview
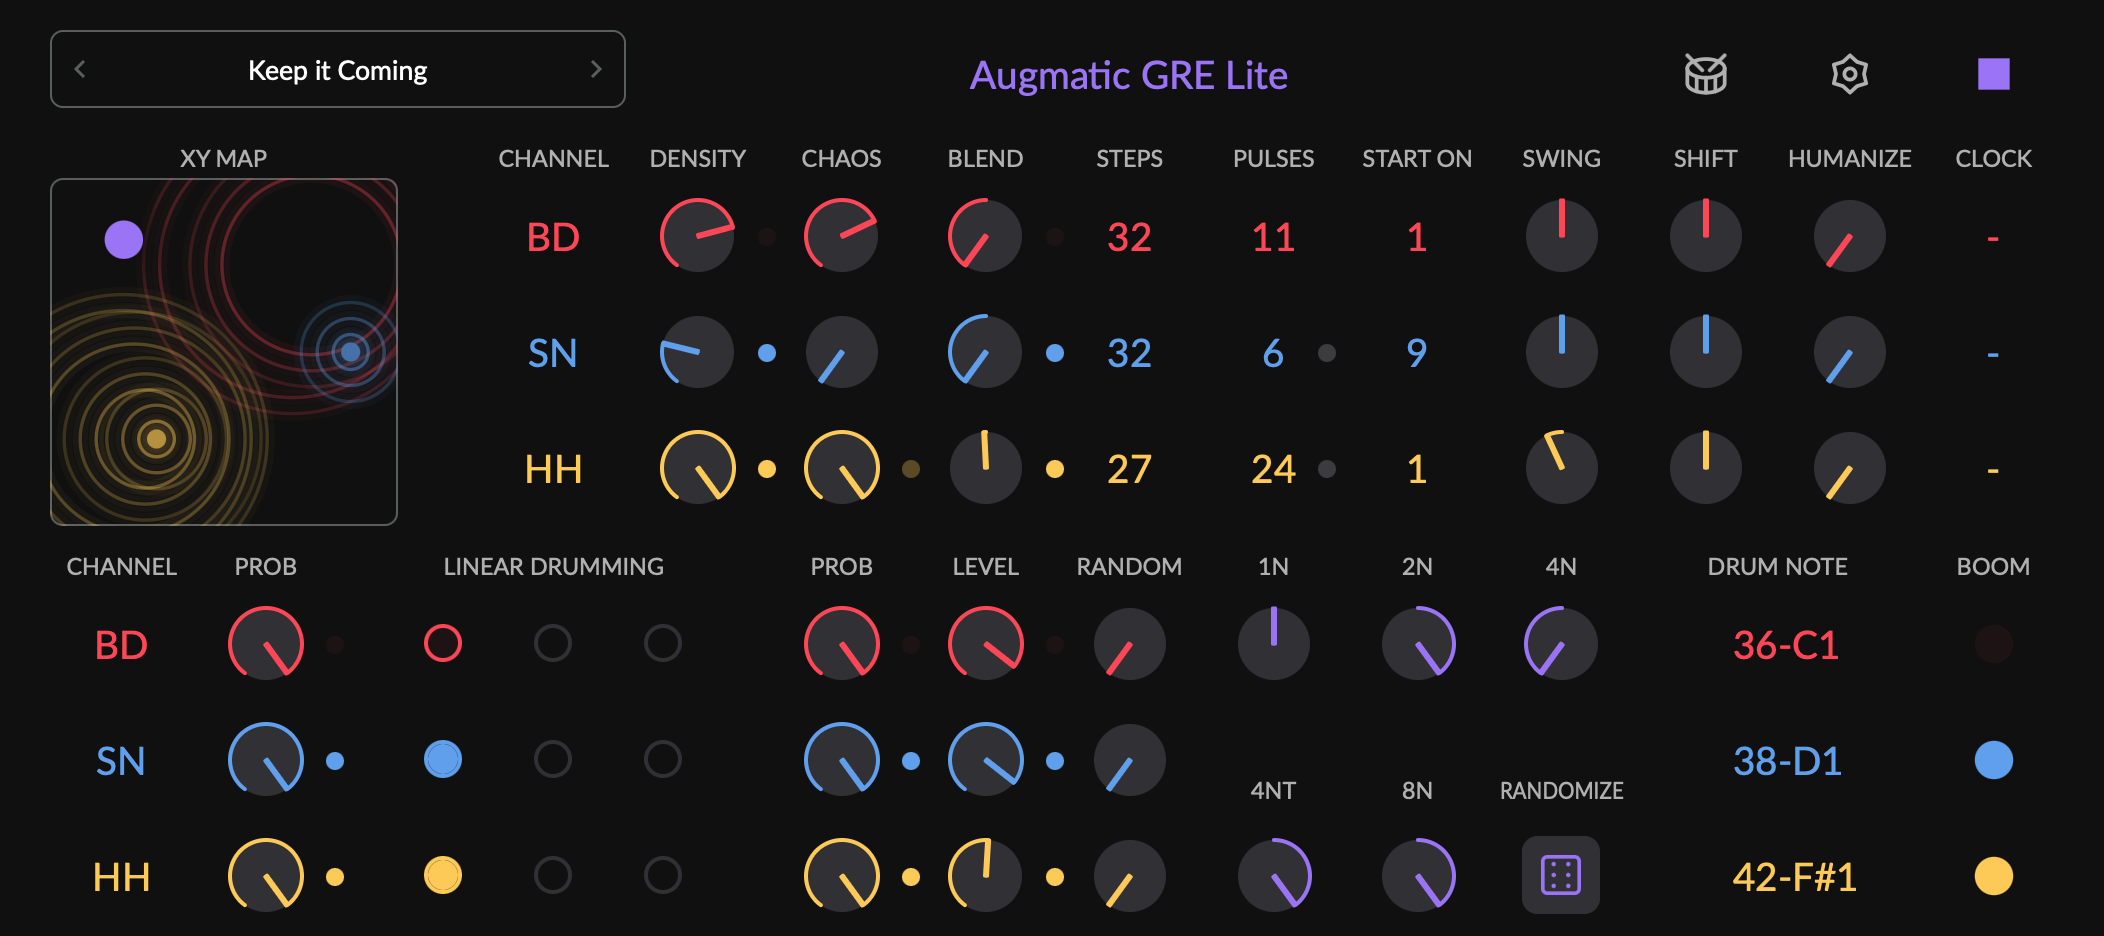
Title Bar
- PRESET MENU on the left — shows the loaded preset, and loads, saves and steps through presets.
— opens the KIT MAPPINGS browser, where you pick which note each channel sends.— opens SETTINGS./
Upper Section — pattern generation
- XY MAP — the main control of Topographic engine.
- CHANNEL names — BD, SN and HH.
- DENSITY and CHAOS — how busy the generated pattern is, and how much it deviates.
- BLEND — mixes between the two pattern engines.
- STEPS, PULSES and START ON — the Euclidean engine.
- SWING, SHIFT and HUMANIZE — the groove controls.
- CLOCK — the clock ratio for that channel, so one channel can run at half or double the speed of another.
The XY MAP is global . Dragging its dot moves all three channels across the same pattern map at once, which is the fastest way to find a groove. See Topographic Engine.
Lower Section — note selection and velocity
- CHANNEL — the same three channels again.
- PROB and LINEAR DRUMMING — how often a hit survives, and which channel wins when two land on the same step.
- LEVEL and RANDOM — the base velocity and how much it varies.
- DRUM NOTE — the MIDI note this channel sends. Defaults are
36for BD,38for SN and42for HH. - LEDs on the right show the pulse each channel generates. Tap an LED to trigger that drum by hand.
Every value is set by dragging. Point at a number or knob and drag up or down. A quick flick keeps scrolling for a moment, so long ranges are fast to cross.
BD, SN and HH Channels
BD, SN and HH are the three generative channels — bass drum, snare and hi‑hat. Each one has its own PATTERN, GROOVE, LINEAR DRUMMING and VELOCITY parameters, so the three parts can be modified independently during a performance.
Assign a different MIDI note to each channel in the DRUM NOTE column, so it triggers a different drum sound. You can load ready assignments for various drum machines using the KIT MAPPING icon.
In the original Mutable Instruments Grids hardware, the pattern map drives each part from its own topography. Augmatic GRE Lite keeps that behaviour: move the XY MAP position and all three channels change together, while each channel's own DENSITY decides how much of its part is heard.
Beat Monitor
BEAT MONITOR are small animated dots that appear next to parameters during playback. They visualize the pulse at that stage — whether it’s being generated, passing through, or blocked by the parameter.
This live LED is wired to a specific stage of the signal chain, letting you see how each parameter shapes the rhythm you hear. Each dot carries the colour of its channel, so a glance tells you “BD and SN are firing, HH is silent”. When the dot next to PROB knob is dimmed, probability is choking that channel's pulse. If you prefer a cleaner interface, you can disable Beat Monitor in SETTINGS.
Pattern Parameters
PATTERN parameters control how the rhythm is created by two independent engines — TOPOGRAPHIC and EUCLIDEAN — and then moved in time.
Both TOPOGRAPHIC and EUCLIDEAN engines have unique rhythmic character, and you can blend them using the BLEND knob to create more complex patterns.
To shape the beat further, Augmatic GRE Lite includes GROOVE TOOLS: SWING, SHIFT, HUMANIZE and CLOCK divider typically found only in modular systems.
Topographic Engine
TOPOGRAPHIC engine plays pre-programmed patterns arranged in a map.
The engine is a port of the Mutable Instruments Grids Eurorack module. Each node of the map stores three distinct rhythmic layers — bass drum, snare, and hi-hat — designed to work together musically.
The TOPOGRAPHIC engine has 3 controls: XY MAP, DENSITY and CHAOS.
XY Map
XY MAP changes the rhythmic character of all three drum channels at once. Every other control acts on one channel only.
When you move the XY coordinates, the engine smoothly blends between the four surrounding nodes using bilinear interpolation, creating an infinite continuum of rhythmic variations. The nodes are arranged in a curated musical topology, so adjacent positions morph between complementary drum styles rather than jumping abruptly.
The animation in the XY MAP can be disabled in SETTINGS.
To get the most out of the TOPOGRAPHIC engine, spend time exploring the XY MAP. Move the dot slowly and listen to how it shapes the beat. The musicality of the original Mutable Instruments Grids Eurorack module - which is the source of this engine - inspired the creation of Augmatic GRE Lite.
Density
DENSITY acts as a threshold: only steps whose level exceeds the threshold will trigger.
Each step in a pattern has a "level" value that represents how strongly that drum hit “wants” to play. Increasing DENSITY lowers the threshold and gradually adds hits in a musically meaningful order — the strongest beats appear first, then fills and ghost notes emerge as you push higher.
- Full left — no notes.
- Center — medium density. Roughly half the available pattern steps trigger.
- Full right — maximum density, all available steps trigger.
Each channel has its own DENSITY knob, so you set BD, SN and HH independently. To move all three at once, drag the XY MAP dot instead — it repositions every channel on the pattern map together.
Tip: Less is More
The sweet spot for most patterns is 40–90% .
Chaos
CHAOS adds controlled randomness to patterns, creating musical variations.
Impact of CHAOS control:
- Full left — mechanical precision, no variations.
- 20% — subtle humanization, living variation.
- Center — noticeable groove variation, surprises each bar.
- Full right — unpredictable, experimental.
CHAOS is per channel. Raising it on HH alone is the usual starting point, because hats tolerate more variation than the kick.
CHAOS has 2 modes, which can be selected in SETTINGS:
- HARDWARE — Faithfull reproduction of the behaviour of the original Mutable Instruments Grids Eurorack module. Once per pattern cycle (2 bars at CLOCK x1), each drum gets a random amount of extra density. CHAOS never removes a hit. Patterns sound a little busier or plainer, but the beat stays recognisable. The pattern changes only at the start of a bar.
- GRE — CHAOS can add hits anywhere and remove hits anywhere, strong ones included. Low CHAOS outputs the pattern with ghost notes. Around halfway, the pattern starts to break up, off-pattern steps fire now and then. At maximum, the result is close to random, weighted toward the pattern.
Tip: Controlled Randomness
- Changing CHAOS over a span of a few bars creates tension and release. For example: start with no CHAOS in bars 1-3, raise it to
50%in bar 4, then drop it back to zero at the start of bar 5. - Use DAW automation to repeat this tension‑and‑release effect across longer sections of the track.
- Raise CHAOS on one channel at a time, so you can hear what each one contributes.
- As you push CHAOS up, watch the BEAT MONITOR dot next to the knob — it flashes whenever randomness adds a note.
Blend
BLEND is a central control of the PATTERN tab. It creates probability-based mix of pulses from TOPOGRAPHIC and EUCLIDEAN engines.
- Full left — 100% TOPOGRAPHIC Engine
- Center — Every note from each engine has the same 50/50 probability of passing or being blocked. Because this probability is uniform rather than weighted, an engine producing a sparse or delicate rhythm may become inaudible when another engine generates a much more intense pattern.
- Full right — 100% EUCLIDEAN Engine
BLEND allows you find a sweet spot between fully repeatable EUCLIDEAN backbone pattern and musically randomized TOPOGRAPHIC pattern. You can also use it to create breaks: quickly flip between 100% mechanical EUCLIDEAN and TOPOGRAPHIC and back to create a short variation.
BLEND is useful for breaks. Automate it in your DAW and the rhythm shifts from one engine to the other over the length of a track, so the beginning and the end play different patterns. Each channel has its own BLEND knob, so a break can move the hats while the kick holds steady.
Tip: Best of Both Worlds
- Mix two engines: set BD BLEND to full left for natural kick patterns, and HH BLEND to full right for mechanical precision.
- Subtle life: set BLEND just slightly below full right — the TOPOGRAPHIC engine subtly replaces or adds notes, keeping the groove alive.
- Gradual transition: automate BLEND from full left to full right over several bars.
Euclidean Engine
EUCLIDEAN engine generates polyrhythmic patterns by distributing pulses evenly across steps.
EUCLIDEAN Engine always plays 100% predictable patterns using Toussaint/Bjorklund algorithm.
Visual examples of EUCLIDEAN rhythms:
  16 STEPS | 4 PULSES | START ON 1:  X . . . X . . . X . . . X . . .
  16 STEPS | 4 PULSES | START ON 3:  . . X . . . X . . . X . . . X .
   8 STEPS | 3 PULSES | START ON 1:  X . . X . . X .
  19 STEPS | 1 PULSES | START ON 5:  . . . . X . . . . . . . . . . . . . .
Instead of drawing a pattern like this manually, you dial three parameters: STEPS, PULSES and START ON.
Steps
STEPS controls pattern length in 16th notes.
You can change the 16th note step duration using CLOCK — /2 divider will slow down the CLOCK 2-times and each step will be 8th note long.
Set STEPS on each of the three channels to the same value — 16 is a good starting point — so they share one cycle length and stay locked together.
Tip: Polyrhythmic Magic
Using different STEPS counts per channel creates patterns that evolve over many bars before repeating.
- Keep BD at
16STEPS - Set SN to
12STEPS - Set HH to
7STEPS - Because each channel loops at a different length, the combined pattern constantly shifts into complex, evolving polyrhythms
Combined with different Clock Divider ratios, this creates even more complex polyrhythmic textures.
Pulses
PULSES sets how many hits are spread evenly across the pattern's STEPS.
Turn it up for a busier part, down for a sparse one. It ranges from 0 (silent) to the current STEPS value — a hit on every step — and defaults to 4. PULSES is automatically limited to STEPS range.
Tip: World Music Flavors
Odd pulse counts create instant world music flavors.
Start On
START ON rotates the pattern so it begins on the step you choose.
You can move the whole rhythm without changing its shape. Leave it at 1 and the first hit lands on beat 1 — no shift. Raise it to N and the pattern slides right until its first hit falls on step N, handy for offsetting one channel against another or nudging an accent off the downbeat. It runs from 1 to the current STEPS and defaults to 1.
START ON is especially useful for snare drums, which almost never land on the first beat but typically hit on beats 3, 5, and similar off‑beats.
START ON is automatically limited to STEPS range.
Tip: Instant Syncopation
- Set a straight snare pattern: STEPS=
16, PULSES=2 - Change START ON to hear the snare land in unexpected places while the kick stays anchored
- Each START ON position gives a completely different groove character
- Watch the BEAT MONITOR dot — it flashes once per cycle to show where the EUCLIDEAN loop restarts
Popular Euclidean Rhythms
EUCLIDEAN rhythms can be found in traditional music worldwide:
| Steps | Pulses | Description |
|---|---|---|
8 |
3 |
Tresillo — fundamental Cuban rhythm |
8 |
5 |
Cinquillo — classic clave-like pattern |
12 |
5 |
Son clave variation |
12 |
7 |
Traditional bell pattern |
16 |
5 |
Rumba clave stretched to 16 steps |
16 |
7 |
Dense, complex polyrhythm |
13 |
5 |
Classic African bell pattern |
16 |
9 |
Modern electronic pattern |
[Factory] Euclidean folder contains many PRESETS with EUCLIDEAN rhythms; you might find them surprisingly musical and useful as starting points for your own experimentation with this engine.
Groove Tools
GROOVE TOOLS don’t change what pattern the engines play — they change how the pulses feel in time.
SWING, SHIFT, HUMANIZE , and CLOCK each act per channel, so every instrument keeps its own feel — one drum shuffles while another stays dead straight, one plays early while another drags behind.
Swing
SWING shifts some beats slightly later or earlier to create groovy feel.
SWING is based on the Roger Linn algorithm.
- Right knob position — delays the off-beat 16th notes, creating a classic shuffle/swing feel.
- Left knob position — pulls the off-beat 16th notes earlier, creating a rushing feel.
Sometimes it may seem like SWING isn’t doing anything. Make sure your pattern actually contains 16th‑note events — straight 8th‑note rhythms won’t swing because the 16th-note subdivisions aren’t present.
Tip: Shuffle Feel
Shift
SHIFT moves a channel’s pulses so they play slightly earlier or later in time.
SHIFT is using two different mechanisms depending on the knob side:
- Left — accelerates the CLOCK so notes are generated before their normal grid position.
- Center — SHIFT is
OFF. - Right — delays notes vs. the grid.
Tip: Flam Effects
SHIFT is perfect for creating a flam which is a grace‑note technique where two hits occur almost simultaneously, producing a thicker and more expressive attack.
Humanize
HUMANIZE introduces a small, random delay to each pulse, helping the pattern feel more natural and less mechanical.
HUMANIZE only delays — it never plays ahead because it lives at the very back of the signal chain. Combined it with SHIFT turned to the left, HUMANIZE will also play before the downbeat.
Tip: The Human Touch
Clock
CLOCK slows down or accelerates the playback speed of each channel independently.
/N values divide the CLOCK and slow down the pattern, while xN values multiply the CLOCK and speed up the playback. High /N divider settings stretch the pattern across multiple bars; high xN values produce rapid ratchets. CLOCK values /1.5 and x1.5 introduce a triplet feel.
Tip: Speed Layers
Linear Parameters
LINEAR parameters reduce the intensity of the pattern generated by TOPOGRAPHIC and EUCLIDEAN engines, adding clarity and space for other instruments in your track.
The lower-left part of the GUI carries three LINEAR controls: a PROB knob before the LINEAR DRUMMING matrix, the matrix itself, and a second PROB knob after the matrix.
Linear Drumming
LINEAR DRUMMING matrix controls which channels play or get blocked when multiple channels trigger drum pulses simultaneously.
LINEAR DRUMMING is a playing technique where no two limbs/drums strike together — every hit happens one at a time. It works by assigning different priorities to each channel in the matrix.
- Dots on the left side of the matrix give that channel a higher priority.
- Each instrument has exactly one priority level.
- If two instruments share the same priority level, both play at the same time.
- If two channels with different priorities are triggered simultaneously, only the higher‑priority channel will play.
Simultaneous pulses which get muted appear as dimmed circles, while higher‑priority pulses flash in the channel’s color.
Double-click a column to reset all channels to that priority level. Lower-priority instruments are muted for the duration set by LINEAR GRID in SETTINGS.
Tip: Clean Grooves
Probability Pre and Post
PROB knobs block drum pulses. From 0% — no pulses pass — through 50% — roughly half of the pulses are randomly removed — to 100% — all pulses pass.
The PRE and POST PROB controls have noticeably different musical effects on how the matrix behaves and what you hear:
- PROB PRE (on the left) — filters notes before LINEAR DRUMMING matrix. Any notes removed at this stage behave as if they never existed, allowing other channels with lower priority in the matrix to naturally fill the gaps.
- PROB POST (on the right) — filters notes after LINEAR DRUMMING matrix. This creates intentional gaps in the pattern; whenever a higher‑priority channel would have played, its removed note leaves a space that adds tension and anticipation.
Change of PROB PRE & POST can dramatically reshape the pattern, producing musical and often striking shifts such as build‑ups, breakdowns, returns to the main groove, and even outro‑style reductions.
Tip: Organic Gaps
- Lower BD → PROB PRE to
60–75% - Gaps get filled organically by other instruments through the priority matrix
- Great for evolving, generative patterns that never feel static.
Tip: Breakbeat Stutter
- Set all channels to
50%PROB POST. - Random holes appear in the groove for a stuttering, breakbeat-like feel.
- Unlike PROB PRE, these gaps stay empty, creating rhythmic breathing space and anticipation.
Velocity Parameters
VELOCITY parameters shape the volume of each channel's MIDI notes.
The lower-middle section carries LEVEL and RANDOM per channel knobs, and the VELOCITY BENDER, which is impacting all three.
Some instruments — such as simple one‑shot samplers — are not sensitive to velocity of MIDI notes, and the VELOCITY parameters will not affect their volume. To make use of dynamic VELOCITY control, use a multi‑layer sampler or a velocity‑sensitive drum synthesizer.
Level
LEVEL assigns a fixed velocity value to all MIDI notes going out of the channel.
Setting LEVEL to 0 mutes the channel. Per the MIDI specification, velocity 0 means Note Off — no MIDI note is sent.
Random
RANDOM adds velocity randomization around the fixed velocity LEVEL.
0%— Output velocity equals LEVEL exactly50%— Output velocity is halfway between LEVEL and a random0–127value100%— Output velocity is fully random (0–127), regardless of LEVEL setting
Tip: Dynamic Variation
Velocity Bender
VELOCITY BENDER modulates note velocity using a bar-synchronized LFO to create rhythmic accents that evolve over time.
Five bipolar knobs are blended into a single smooth LFO curve to control which beat divisions will play with higher or lower volume:
- 1N — Whole note — Slow one-bar velocity sweep cycle
- 2N — Half note — Slow, wide modulation over 2 beats
- 4N — Quarter note — Pulse-aligned modulation on every beat
- 4NT — Quarter-note triplet — Triplet feel — 3 cycles per 2 beats
- 8N — Eighth note — Fast modulation, twice per beat
Each knob ranges from -1.0 to +1.0 with 0.0 at center (no modulation). Positive values increase volume, negative values reduce volume at that division.
- button — randomizes all five knobs.
- button — — resets all knobs to center (
0.0)
The VELOCITY BENDER is the final velocity processing stage before MIDI output. It multiplies the LEVEL velocity by the LFO value, so the modulation is proportional.
Tip: Rhythmic Breathing
- Start with the 4N and 8N knobs — these create the most rhythmic, danceable velocity patterns.
- Watch the waveform display to see the combined LFO shape in real time.
- Mix positive and negative values across divisions for complex, evolving dynamics.
- Use a multi‑layer sampler or a velocity‑responsive drum synth; VELOCITY BENDER can change the groove dramatically.
Settings
Augmatic GRE Lite SETTINGS menu opens from the gear icon in the title bar.
- RENAME instruments from BD, SN an HH to "KICK", "SNARE" etc. Names are saved with the KIT MAPPING, not with the preset, so a mapping written for a particular drum machine carries that machine’s own labels.
- THEME — change color theme from DARK to LIGHT and others. Themes are stored in XML files, you can easily create your own THEME as well.
- BEAT MONITOR —
ON/OFFshows or hides BEAT MONITOR LEDs. - ANIMATION — shows or hides XY MAP ripples animation.
- WINDOW SIZE — resets GUI size to DEFAULT.
- DRUM LENGTH — the length of MIDI notes going out of the plugin.
- LINEAR GRID — how long pulses of other channels will be muted by LINEAR DRUMMING.
Preset System
PRESETS store all musical parameters that generate the rhythm, while KIT MAPPING holds the BD, SN and HH note assignments to MIDI notes. This separation is intentional: the PRESET defines the music, the KIT defines how your instrument plays it.
After you configure the KIT MAPPING correctly for the sampler or synth that you use, loading of PRESETS won't change this configuration and your instrument will continue to play the new preset.
| Loading of | Changes |
|---|---|
| PRESET | Everything musical — DENSITY, CHAOS, MAP XY, STEPS, PULSES, START ON, BLEND, SWING, SHIFT, HUMANIZE, CLOCK , PROB, LINEAR DRUMMING, LEVEL, RANDOM |
| KIT MAPPING | The three MIDI note values, the CHANNEL names, and the output MIDI channel |
Preset Browser
Tap the preset name at the top left to open the PRESET BROWSER. It shows three columns of folders and files, with an action panel on the left and an info panel on the right.
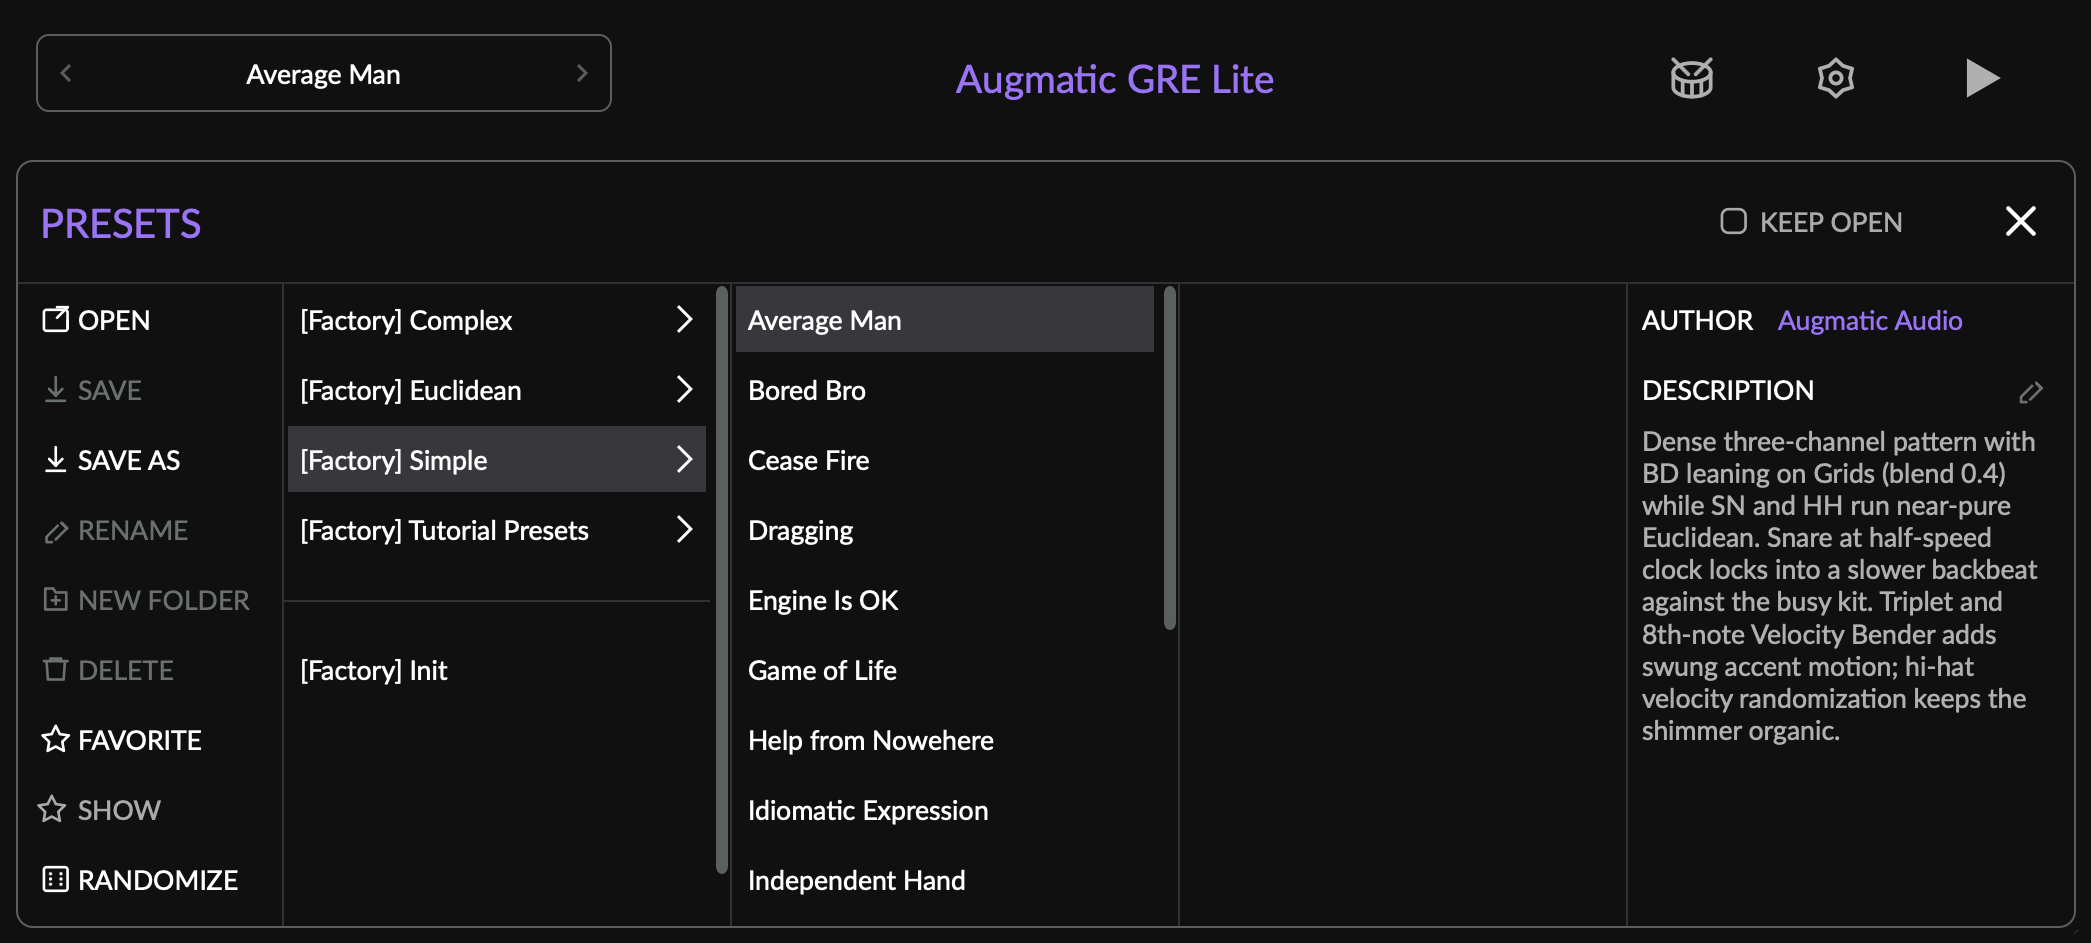
- OPEN — loads the selected preset.
- SAVE — overwrites the preset you have loaded.
- SAVE AS — saves to a new file. Type the name in the header editor.
- RENAME — renames the selected file or folder.
- NEW FOLDER — creates a subfolder to organise your presets.
- DELETE — deletes the selected file or folder. You are asked to confirm.
- FAVORITE — stars a preset so you can find it in the favourites view.
- RANDOMIZE — creates a new patch from random values from a different preset in your library. Because the values come from presets that already work, the result is usually musical rather than noise. Your drum notes are never touched.
- AUTHOR and DESCRIPTION — the info panel on the right. Tap the icon to edit them on your own presets.
- KEEP OPEN keeps the browser open while you load presets, so you can audition several presets without reopening the menu.
- < and > chevrons on the preset menu step to the previous or next preset in the same folder.
Factory and User Presets
- Factory presets ship with the plug‑in. They cannot be modified, renamed or deleted, so your starting library stays intact.
- User presets are XML files you can save, rename, delete and share.
- An asterisk next to the preset name means you have changed something since loading it and you should save it, if you like it.
Your presets are saved to the User Presets folder. See File Storage for its location on each platform.
KIT Mappings
A KIT Mapping decides which MIDI note each of the three channels sends, and which MIDI channel they all go out on. Open the browser from the icon in the title bar, or step through mappings with the chevrons beside the mapping name in SETTINGS.
Factory mappings for common drum machines and samplers are installed the first time you launch, so you have a library from the start. Save your own with the same browser controls listed above.
The output MIDI channel is the same all BD, SN and HH channels, and it lives in the mapping — 10 by default, the General MIDI drum channel.
Standalone App
Augmatic GRE Lite runs as a standalone app on Windows, Mac, iPad and iPhone, without a DAW. It has its own clock and transport, and sends its notes straight to the operating system — see MIDI Output.
Comparison of Plugin and Standalone App
| Feature | Plugin (VST3, CLAP, AU, AUv3) | Standalone App |
|---|---|---|
| Transport | The host DAW controls Play and Stop, and the timeline position | Its own Play and Stop button, plus the spacebar |
| BPM | Follows the host. No BPM control is shown | Set in SETTINGS, 40–240 |
| MIDI Output | Plugin MIDI Output — the host routes it |
The virtual Augmatic GRE Lite port (Mac only), or any hardware device |
| MIDI Channel | One channel for all three drums, set in the KIT Mapping, 10 by default |
|
| DAW Automation | Every automatable parameter is exposed to the host | Not available. |
Transport
- Play and Stop — in the title bar. It starts and stops the internal clock, and it is hidden when the plug‑in runs in a host.
- Spacebar — starts and stops playback without reaching for the button.
Standalone App Settings
- OUT - PORT — MIDI Out port.
- OUT - CHANNEL — Channel of the MIDI Out port.
- BPM — Beats Per Minute, internal clock of the app.
File Storage
Presets and KIT Mappings are stored as XML files in platform-specific directories. Factory content (shipped with the app) and user-created content are kept in separate subdirectories so that app updates never overwrite or delete your custom presets.
Windows
On Windows, the plugins and STANDALONE APP install under Program Files, and PRESETS, KIT MAPPINGS and THEMES live under your Documents folder.
- VST3 Plugin:
C:\Program Files\Common Files\VST3\ - CLAP Plugin:
C:\Program Files\Common Files\CLAP\ - Standalone App:
C:\Program Files\Augmatic Audio\Augmatic GRE Lite\ - Factory Presets:
Documents\Augmatic Audio\Augmatic GRE Lite\Presets\Factory\ - User Presets:
Documents\Augmatic Audio\Augmatic GRE Lite\Presets\User\ - Factory KIT Mappings:
Documents\Augmatic Audio\Augmatic GRE Lite\Kit Mappings\Factory\ - User KIT Mappings:
Documents\Augmatic Audio\Augmatic GRE Lite\Kit Mappings\User\ - Factory Themes:
Documents\Augmatic Audio\Augmatic GRE Lite\Themes\Factory\ - User Themes:
Documents\Augmatic Audio\Augmatic GRE Lite\Themes\User\
Mac
On Mac, the plugins and STANDALONE APP install to the standard system locations, and PRESETS, KIT MAPPINGS and THEMES live under your user Library.
- Standalone App:
/Applications/Augmatic GRE Lite.app - Audio Unit (AUv2,
.component):/Library/Audio/plugins/Components/ - VST3 Plugin:
/Library/Audio/plugins/VST3/ - CLAP Plugin:
/Library/Audio/plugins/CLAP/ - Factory Presets:
~/Library/Application Support/AugmaticGRELite/Presets/Factory/ - User Presets:
~/Library/Application Support/AugmaticGRELite/Presets/User/ - Factory KIT Mappings:
~/Library/Application Support/AugmaticGRELite/Kit Mappings/Factory/ - User KIT Mappings:
~/Library/Application Support/AugmaticGRELite/Kit Mappings/User/ - Factory Themes:
~/Library/Application Support/AugmaticGRELite/Themes/Factory/ - User Themes:
~/Library/Application Support/AugmaticGRELite/Themes/User/
iPad/iPhone
On iOS, PRESETS, KIT MAPPINGS and THEMES are stored in the app's Documents directory, visible in the Files app under On My iPad > Augmatic GRE Lite.
- Factory Presets:
Documents/Presets/Factory/ - User Presets:
Documents/Presets/User/ - Factory KIT Mappings:
Documents/Kit Mappings/Factory/ - User KIT Mappings:
Documents/Kit Mappings/User/ - Factory Themes:
Documents/Themes/Factory/ - User Themes:
Documents/Themes/User/
You can browse, copy, and share these files directly from the iOS Files app. To import a preset someone shared with you, drop the XML file into the User/ folder.
AUv3 — Files App Access
When running as an AUv3 plugin inside a host (AUM, Cubasis, Drambo, etc.), the plugin needs permission to access the standalone app's Documents folder. On first use, a blue “Enable Files App Access” popup appears at the top of the plugin interface.
- Tap the button
- A folder picker opens, pre-navigated to the Augmatic GRE Lite Documents folder
- Tap Open to grant access
After this one-time setup, presets you save in the AUv3 are immediately visible in the Files app — no need to launch the standalone app. The permission persists across app restarts and device reboots.
If you skip this step, the AUv3 still works normally but uses an internal storage area not visible in the Files app.
If you already understand how Augmatic GRE works and have a specific question, see the Frequently Asked Questions (FAQ).